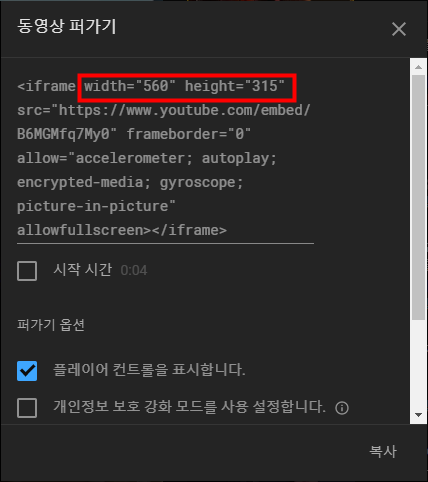
유튜브에서 공유하기 해서 소스보기로 소스를 퍼오게 되면 크기가 고정이 되죠

그렇다고 width = 100% 로 조절해도 제대로 된 반응형으로 임베드시키지는 못합니다.
여기서 약간의 코딩을 해줍니다.
css 로 반응형 임베디드 형식으로 바꿔줍니다.
유튜브를 반응형으로 만들기 위한 css 코드는 아래와 같습니다.
/* 레이어의 크기를 반응형으로 */
.youtube-dklab {
	position:relative;
    width:100%;
    height:0;
    padding-bottom:56.25%;
}

/* iframe 의 크기를 부모요소에 맞게 조절 */
.youtube-dklab iframe {
	position: absolute;
    top:0;
    left:0;
    width:100%;
    height:100%;
}
그리고 embeded 형식으로 가져온 소스에 레이어를 입혀줍니다.
아래와 같은 방식으로 html 페이지에 입력시 반응형으로 작동하게 됩니다.
<div class="youtube-dklab">
    <!--유튜브에서 퍼온소스-->
    <iframe width="560" height="315" src="https://www.youtube.com/embed/B6MGMfq7My0" frameborder="0" allow="accelerometer; autoplay; encrypted-media; gyroscope; picture-in-picture" allowfullscreen></iframe>
</div>
그럼 예제 페이지를 보시죠~!
https://dklab.netlify.com/dklab-demo1.html
유튜브 반응형 테스트
dklab.netlify.com
브라우저에 사이즈에 따라 사이즈가 변하는것을 볼수 있습니다.
html 파일 풀 소스입니다.
<!doctype html>
<style>
/* 레이어의 크기를 반응형으로 */
.youtube-dklab {
	position:relative;
    width:100%;
    height:0;
    padding-bottom:56.25%;
}

/* iframe 의 크기를 부모요소에 맞게 조절 */
.youtube-dklab iframe {
	position: absolute;
    top:0;
    left:0;
    width:100%;
    height:100%;
}
</style>

<html lang="ko">
 <head>
  <meta charset="UTF-8">
  <title>유튜브 반응형 테스트</title>
 </head>
 <body>
	  <div class="youtube-dklab">
		<!--유튜브에서 퍼온소스-->
		<iframe width="560" height="315" src="https://www.youtube.com/embed/B6MGMfq7My0" frameborder="0" allow="accelerometer; autoplay; encrypted-media; gyroscope; picture-in-picture" allowfullscreen></iframe>
	</div>
 </body>
</html>
'IT' 카테고리의 다른 글
| 주식 일복리 계산기 (0) | 2019.07.19 |
|---|---|
| 주식 일복리 계산기를 만들어 봅시다. (0) | 2019.07.17 |
| OCR 광학 문자 인식 (구글드라이브 이용 (0) | 2019.07.08 |
| 윈도우 바탕화면은 아이콘이 깨지거나 원하는 아이콘으로 나타나지 않을때 (0) | 2019.07.04 |
| VB6.0 휠이 작동하지 않을 때 (비주얼베이직 6.0) (0) | 2019.07.03 |


댓글